Can You Use AI to Make a HighLevel Positive Intent Trigger?

I’ve got a fun one for you today…
You probably already know that HighLevel has some pretty advanced functions…
But did you know that there are AI integrations already baked into your platform?
The HighLevel hack I’m going to show you is built off of Google’s Dialogueflow, a natural language comprehension program that was developed for chatbots. And our project will let you target an existing database of leads with a simple question.
Essentially, the way Dialogueflow works in this case is to understand whether your lead is responding positively or negatively…
So words like “Yes,” “Sure,” and “Ok” would translate to a positive response.
This is what our project is going to look like:

When Would You Use This HighLevel AI Hack?
The whole point is that you want to take a large number of contacts and weed it down to those that are actually interested in your offer…
WITHOUT the added friction of launching directly into a sales pitch.
And that’s where the positive intent comes in…
See, when your leads say yes, it’s an excellent first step to get them engaged, and then you follow that up with a more standard campaign to convert them…
And even if they answer no, you could add them to a long-term nurture campaign (although we’re not going to create that in this guide).
So, what do you need to do? Here’s the three steps to implement a setup that uses Dialogueflow’s positive intent:
- Create an outreach campaign
- Create a follow-up campaign for your leads that have positive intent.
- Set up your positive intent trigger
Optionally, you could also add these features:
- A long-term nurture campaign for leads with a negative or no response
- A funnel landing page for traffic from your follow-up campaign
- And even an appointment reminder campaign if you’re dealing with bookings
So let’s get started with…
Step 1: Create Your Outreach Campaign
The first thing we need to do is create an outreach campaign and add a single SMS event (alternatively, you could use email)…

Here, we’re just asking a simple question designed to generate a response from interested leads…
And if they answer positively, then we want to fast-track them to take action. It could be an appointment booking, a purchase, or any other action that you’re looking to achieve. For our demo, we’re going to target a booking.
Now, it’s time for…
Step 2: Create Your Follow-Up Campaign
At this point, we’ve already received a positive response from our lead and they’re engaged, so now we want to add in a call-to-action. Of course, you could make this campaign more complex, but remember that your lead has already stated that they’re interested…
We’ll create a single SMS event in our campaign that asks the lead to book an appointment:

And just like that our campaigns are set, but we need to tie them together with…
Step 3: Create Your Positive Intent Trigger
This simple trigger is what will move your positive intent leads from your outreach campaign to the follow-up campaign…
And all you need to do is create a new trigger rule:

For the event, choose Customer Replied and then add the following filters:
- Reply Channel: SMS
- Intent Type: Positive/yes
- Replied To Campaign: Your outreach campaign
And for the action, select Add to Campaign and then select your follow-up campaign from the drop-down
The last thing to do is…
Test Your Positive Intent HighLevel Hack
Let’s take a quick test drive to see this setup works in practice…
Open up Conversations and select yourself in the left Contact list (if your details aren’t listed, just add yourself as a contact).
Then scroll down, click Add under Active Campaigns, and select your outreach campaign from the pop-up.

What this should do is send an SMS to your phone number with the event from your outreach campaign.
And here it is!

To test your setup, let’s send back a response…

Because the AI recognizes “Sure” as positive intent, we can see that HighLevel automatically adds us to the follow-up campaign (Replied Yes) that we created:

And, as you might have guessed, now we receive the SMS event from the follow-up campaign:

Awesome!
Everything is working perfectly and your HighLevel positive intent setup is ready to go…
As you can see, this type of campaign and trigger is extremely useful for when you want to segment your VERY interested leads from those who still need more time…
Or when you want to re-engage with an existing database of leads…
And speaking of being extremely useful, if you haven’t done so already, be sure to check out all the hacks, tweaks, and improvements that a PRO plan with GHL Experts will give you…
Note: The screenshots and idea for this article come from Chase Buckner’s excellent YouTube video describing this process. You can see the video here.
Use HighLevel to Schedule ALL Your Holiday Campaigns in a SNAP!

Holiday Campaigns in a SNAP
Today, I’ve got a HighLevel hack for you that’s so easy, you’ll probably be wondering what’s the point of even adding it to your repertoire…
What we’re talking about is pre-planning holiday promotions. And with no beating around the bush, here’s…
Why You’ll Want to Schedule Your Holiday Campaigns in Advance
If you’re a business owner, it’s pretty simple – spend just a couple hours and you’ll have all your campaigns set for the dozen or so holidays in the entire year, saving you a ton of time and effort…
But if you’re a marketing agency, then the benefits go even further…
That’s because you can add pre-planned holiday promotions as a feature of your service and add it to your standard onboarding procedure to create more perceived value and increase the cost of your packages with minimal effort on your part…
It’s a win-win for you AND your clients.
>> Discover more PRO Highlevel tweaks with GHL Experts! >>
So, how do you pre-plan holiday promotions with HighLevel? It’s literally a two-step procedure:
- Create a holiday campaign
- Create a custom date trigger
Let’s take a look at those two steps in detail…
Step 1: Create Your Holiday Campaign
We’re going to use July 4th as an example, but really you can use this hack for any holiday or annual event that always falls on the same day…
First, we’ll create a campaign and call it 4th of July (Marketing → Campaigns → Create Campaign)…
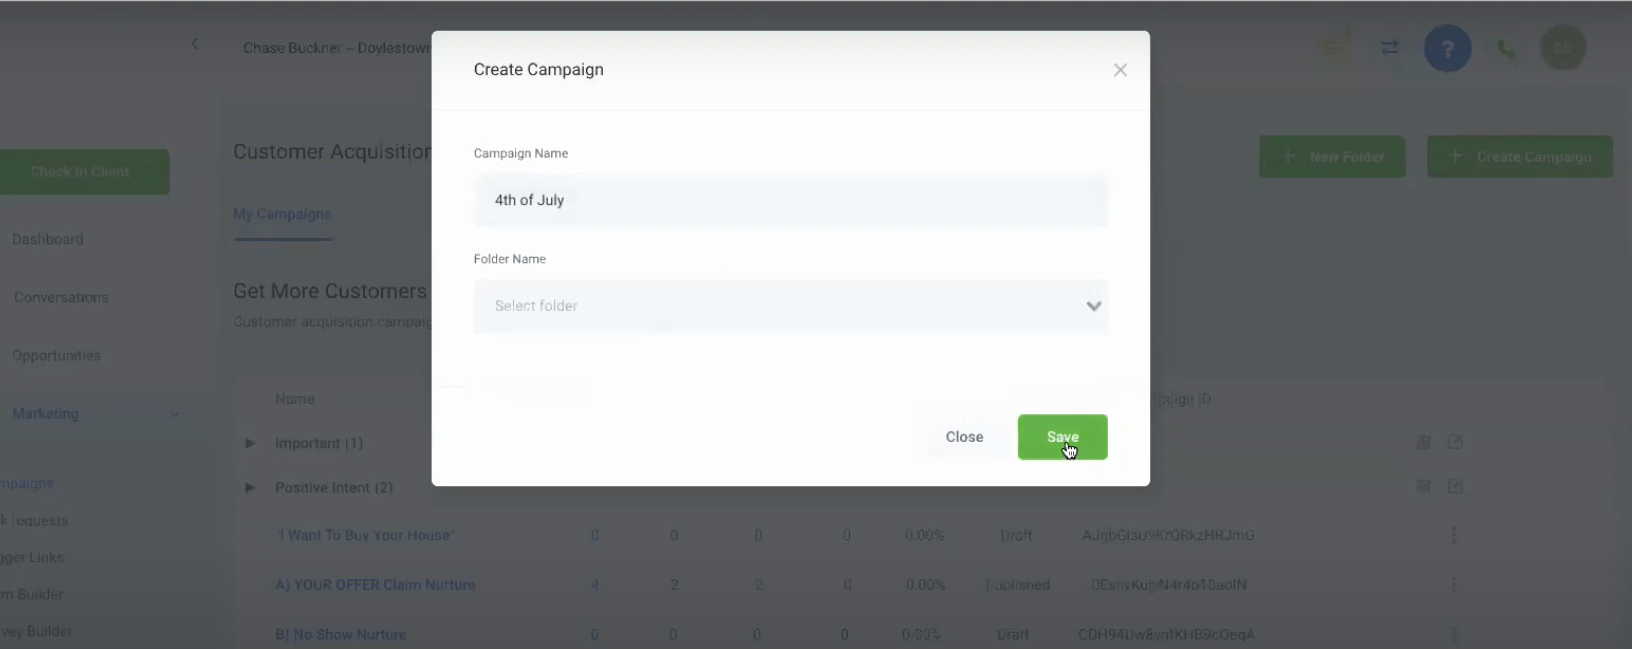
Holiday Campaigns in a SNAP
And within that newly-created campaign, we’ll add a single email event:
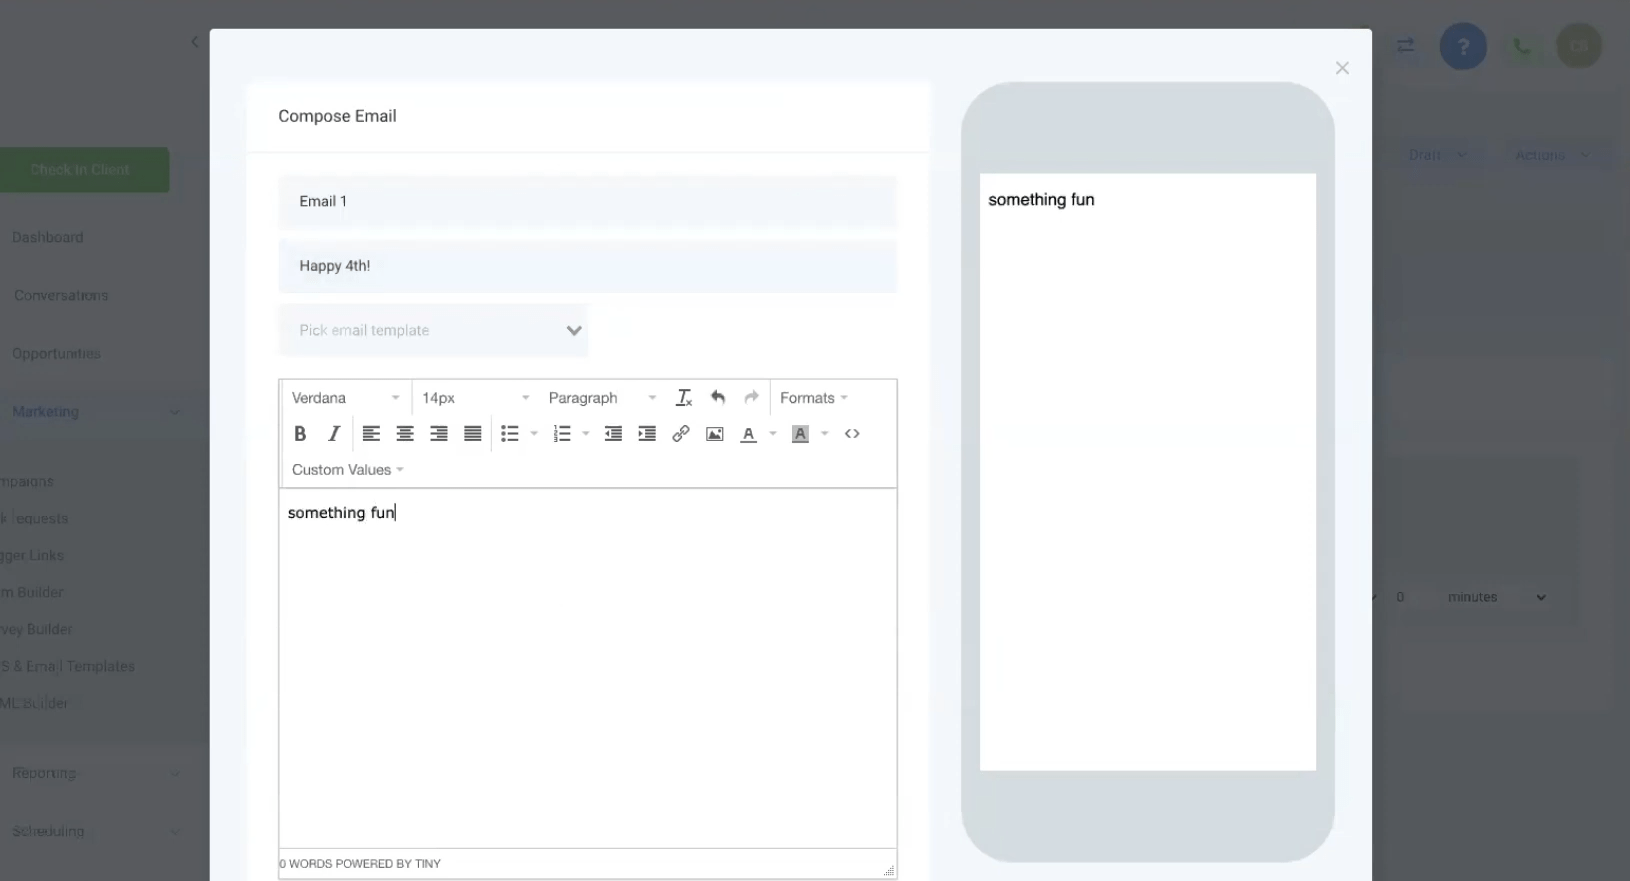
Holiday Campaigns in a SNAP
We’re just putting in some demo text now, but imagine that you use this campaign for anything you want, like…
- Announcing a special offer/promotion
- Inviting clients to a holiday event
- Wishing them a happy holiday
Or any other kind of promotion you can come up with.
Great! Now, we’ve got our quick campaign built and we can move on to…
Step 2: Create Your Custom Holiday Trigger
What you’re going to do is tell HighLevel to fire off this campaign to ALL the contacts in the system every July 4th…
And the way you do that is create a custom trigger rule. We’ll call ours 4th of July:
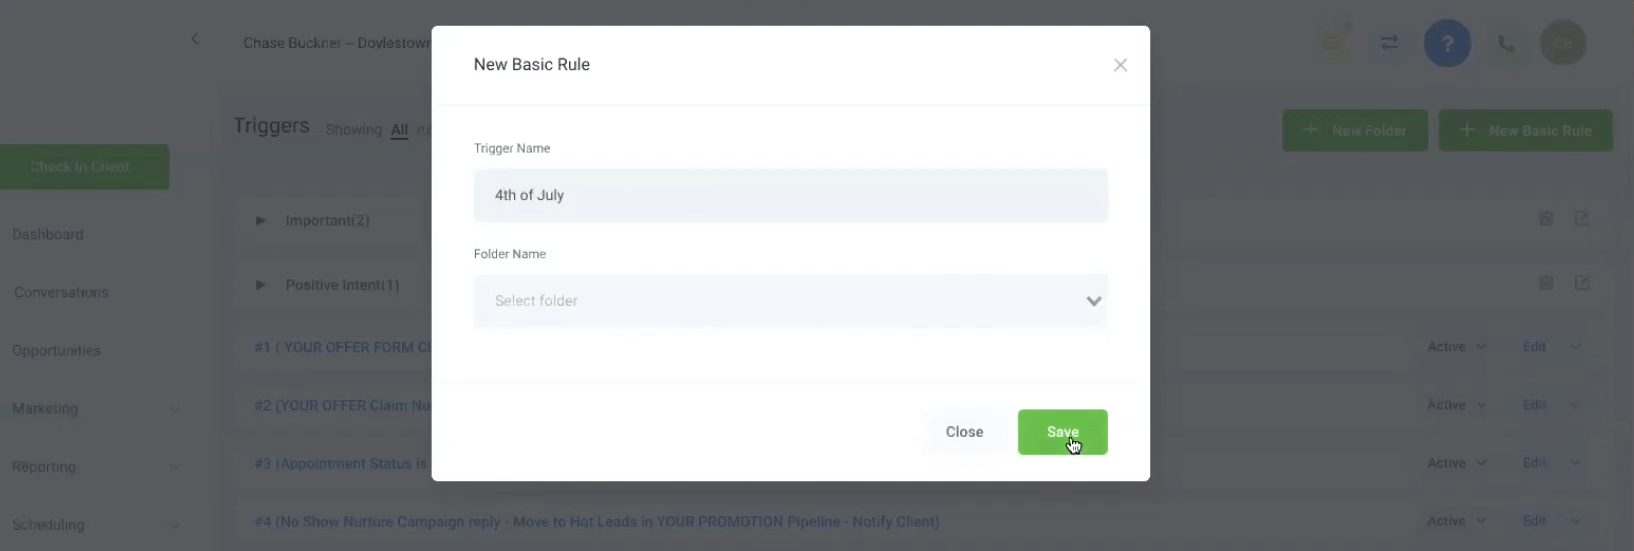
Holiday Campaigns in a SNAP
Now, when you open up that rule, you’ll set the following triggers and actions:
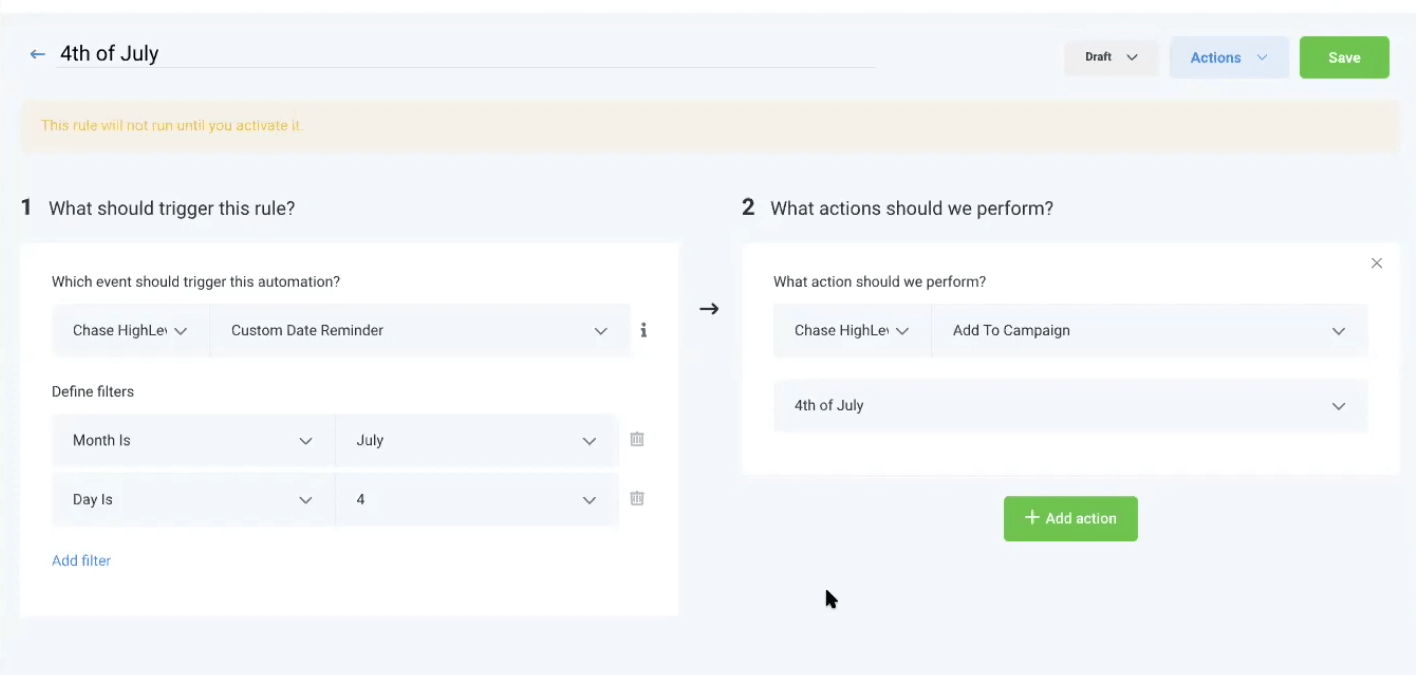
Holiday Campaigns in a SNAP
For your trigger event, select Custom Date Reminder…
Then set the Month is and Day is filters to July and 4th.
In the right column, you only need to choose Add To Campaign and then select the holiday campaign you built in the first step.
And just like that, we’re done!
Now every year on July 4th, your client’s contacts will receive an email…
You could leave it as-is to keep the brand top of mind, or change an offer or promotion in a snap by simply editing the campaign.
Sure, this is a basic HighLevel hack, but it can be extremely powerful when used properly. And it’s that perfect blend of client benefit and minimal effort that your marketing agency should be using to enhance your packages.
For more time-saving, productivity-boosting, and value-adding tweaks and tricks, don’t forget to…
>> Click here and claim your FREE 14-day trial of GHL Experts PRO! >>
Note: The screenshots and idea for this article come from Chase Buckner’s excellent YouTube video describing this process. You can see the video here.
How to Boost Your Positive Reviews with HighLevel
How to Boost Your Positive Reviews with HighLevel

Remember the how-to guide we created for setting up automated appointment reminders in HighLevel?
Well, today, we’re going to piggyback on that idea and take it up a notch. We’ll build out a simple review collection system for following up with completed appointments…
But before we get into the nitty gritty, I have to tell you that we’ll be treading in some controversial waters…
That’s because the method I’m going to show you has been outlawed by both Google and Yelp. With that in mind, if you decide to use this review gating technique, you do so at your own risk and your or your clients’ sites could incur penalties (although detection seems nearly impossible)…
Why would you want to add review gating as a service to your clients?
Well, there are 2 main reasons and both of them are pretty motivating:
- Reason #1 – This system WORKS. It adds more legitimate, positive reviews to a listing while quarantining negative reviews at the same time. This increases the listing’s review score AND gives the client the ability to respond directly to dissatisfied customers, thus elevating their service.
- Reason #2 – Because it’s all automated, review gating is both easy to implement and quite profitable. Set it up once and then bill your client every month. Pretty attractive, right?
And if you want to give your clients a unique HighLevel dashboard experience…
>> Check out the PRO plan at GHL Experts! Your first 14 days are FREE! >>
With all this preface out of the way, let’s get started. The mind map below is the basic plan we’ll follow:

The way it’ll work is like this:
After the customer has an appointment with our client, they’ll receive an email asking if the experience is good or bad, with links to both. If the…
- good link is clicked, the customer will be asked to leave a review.
- bad link is clicked, the customer will NOT be asked to leave a review and a notification will be created for the client to deal directly with the customer.
And the links themselves will go to individual landing pages. We’re not going to add them for this demo – we’ll assume that you know how to build a landing page.
Here are the individual 4 steps we’ll need to complete this process. You’ll note that we’re mainly working backwards:
Step 0: Create an Appointment Reminder Campaign and Good/Bad Landing Pages – if you haven’t built an appointment reminder campaign, check out our article here.
- Create a Good Followup Campaign
- Create a Bad Followup Campaign
- Create Trigger Links and Rules
- Create a Review Campaign
- Attach the Review Campaign to the Appointment Reminder Campaign
So, the first thing we need to do is…
Step 1: Create a Good Followup Campaign
In HighLevel, we’ll create a new campaign called Good Experience (Marketing → Campaigns → Create Campaign)…
And then add a single Email Event:

Here you can see that we’ve created a simple email with the following Subject and Body:
Subject
We’re so happy you had a good experience
Body
Hi {{contact.first_name}},
We’re so happy you had a good experience. Your feedback means the world to us. Would you mind taking a quick minute to leave us a review on Google? Positive reviews really help us grow.
Click Here to Leave Us a Review
Thanks in advance!
And for the link, we’ll use…
https://search.google.com/local/writereview?placeid=PASTEHERE
To get your place ID, go to Google Developers Tools and enter the business name. Then replace PASTEHERE with the actual ID number.
This link will directly open the Google listing for the customer to leave a review, which is exactly what we want.
Great! Step 1 is complete. Moving forward…
Step 2: Create a Bad Followup Campaign
Like the Good Experience campaign, we’ll also need to create a Bad Experience campaign with a single Email Event:

And here’s our Subject and Body for this email:
Subject
We’re Sorry
Body
Hi {{contact.first_name}},
We’re sorry you had a bad experience with us and we want to remedy the situation immediately.
We’re also going to add a notification for our client that lets them know they need to follow up with this customer…
But first, we’ll skip ahead to…
>> Discover a full range of impressive HighLevel add-ons with your 14-day Pro GHL Experts membership! >>
Step 3: Create Trigger Links and Rules
In this step, what we want to do is create triggers that will be attached to our review campaign…
And these links will let a customer choose whether they had a good experience or a bad one, thus deciding whether they’ll be put in the Good Experience or Bad Experience campaigns that we’ve just created.
First up is our trigger links. Let’s create two trigger links like this (Marketing → Trigger Links), one for good and one for bad:

You’ll notice that we’ve used “https://oursite.com/good” as our demo link. This should be the URL of your “good” landing page…
And we’ll do the same thing for our “bad” trigger link:

Now we need to integrate these links into two trigger rules. The first rule is for our good experiences:

This trigger basically says that when the “good” trigger link is clicked, then the customer will be added to the Good Experience campaign…
The “bad” trigger rule is slightly different:

You can see that when the “bad” trigger link is clicked, the customer is added to the Bad Experience campaign…
But that’s not the only thing that happens. Remember the notification we want to send to our client?
It’s the second action in the right column…
When a customer has a bad experience, an SMS will be triggered to our client letting them know they have a…
RED ALERT – bad review from {{contact.name}}
And that they need to deal with it ASAP!
Now, we need to set up a campaign that kicks off the whole review process…
Step 4: Create a Review Campaign
Like our Good and Bad Experience campaigns, our Review campaign is only going to have a single Email Event:

Here we’ve got the following Subject and Body:
Subject
How was your visit?
Body
Hi {{contact.first_name}},
Thanks for coming to see us yesterday. We’d love to know how your experience was with us!
IT WAS GREAT!
IT WAS BAD 🙁
As you’ve probably guessed, the two links in the email are our good and bad trigger links, which send the customer to our landing pages for each.
Now, the last thing we need to do is tie it all together within our Appointment Reminder campaign.
Step 5: Attach the Review Campaign to the Appointment Reminder Campaign
What we’re going to do is open our Appointment Reminder campaign and add a Wait Event:

This tells HighLevel to wait 1 day after the last campaign event (an SMS Appointment Reminder set to fire 2 hours before the customer’s appointment)…
And then add them to a new campaign, which you may have guessed is our Review Campaign (called Feedback Outreach in this demo). Select your Review Campaign as the Next Campaign from your Campaign Configuration view:

And that’s it! We now have an up and running review gating system…
Obviously, you can make yours more elaborate and detailed, but the basic functionality will likely be the same…
And from your client’s perspective, what they’ll see is…
- More positive reviews
- Less negative reviews (and the ability to deal with them directly)
- A higher review rating
At the same time, you’ll benefit from a highly-effective, billable service that requires little-to-no upkeep.
It’s a win-win, right?
Just keep in mind that, as mentioned before, this practice is banned by Yelp and Google, so if you decide to use it, then it’s at your own risk…
For more HighLevel hacks and scripts, be sure to…
>> Sign up for a free, 14-day trial of GHL Experts PRO and take your marketing to the next level! >>
Note: The screenshots and idea for this article come from Chase Buckner’s excellent YouTube video describing this process. You can see the video here.
3 Quick Hacks to Load Your HighLevel Pages LIGHTNING FAST!
Ever try to open up a website and it takes FOREVER to load…
Yeah, of course – we all have…
As you’ve probably noticed, one of the good things about HighLevel pages is that they’re pretty darn fast out of the box and only have the elements you add in, which means no bloatware…
But even still, there are ways you can take the already quick HighLevel pages and make them true speed demons, and that’s what this article is about.
Today, I’m going to show you 3 easy hacks that will give your pages a turbo boost:
- Reduce the Size of Your Images
- Google Maps Without the Heavy Load
- Change Your Page’s DNS Settings
And the best part?
You can implement ALL OF THEM in less than 30 minutes!
Now, I’m going to assume you know why having a fast-loading site is extremely important, but just in case you don’t, here’s the main reason…
Every second matters.
And when you’re talking about a visitor opening your page, every second that passes without the page loading is another opportunity for them to close the tab or change their mind…
Which is a terrible result of your marketing efforts, and one I know you want to avoid.
Hopefully, our 3 hacks will help you get your HighLevel pages up to speed. And for other great tips and tricks, don’t forget to…
>> Claim your 14-day Pro trial membership with GHL Experts! >>
Here’s the page we’ll be working with today:
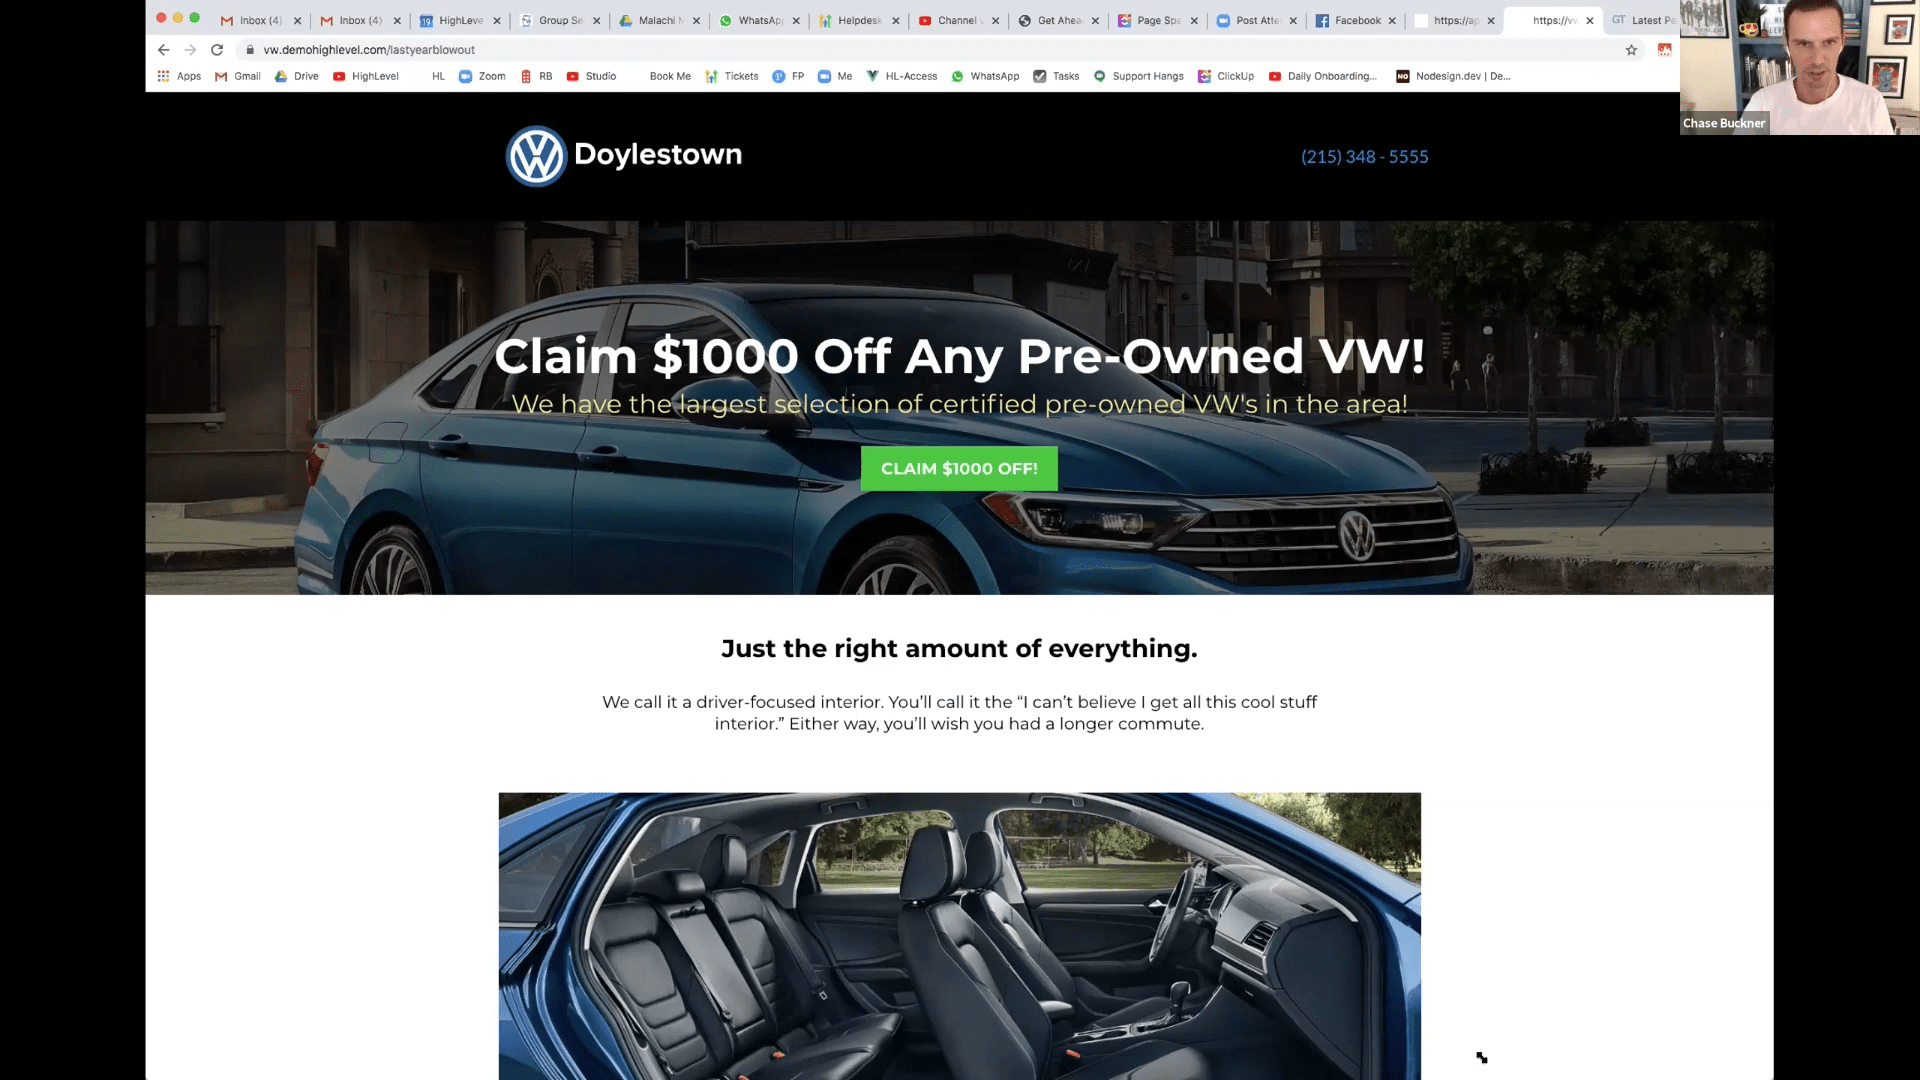
Let’s start by running an analysis of the page over at gtmetrix.com (which is an excellent resource to keep bookmarked). Here’s what GTmetrix says about our page:
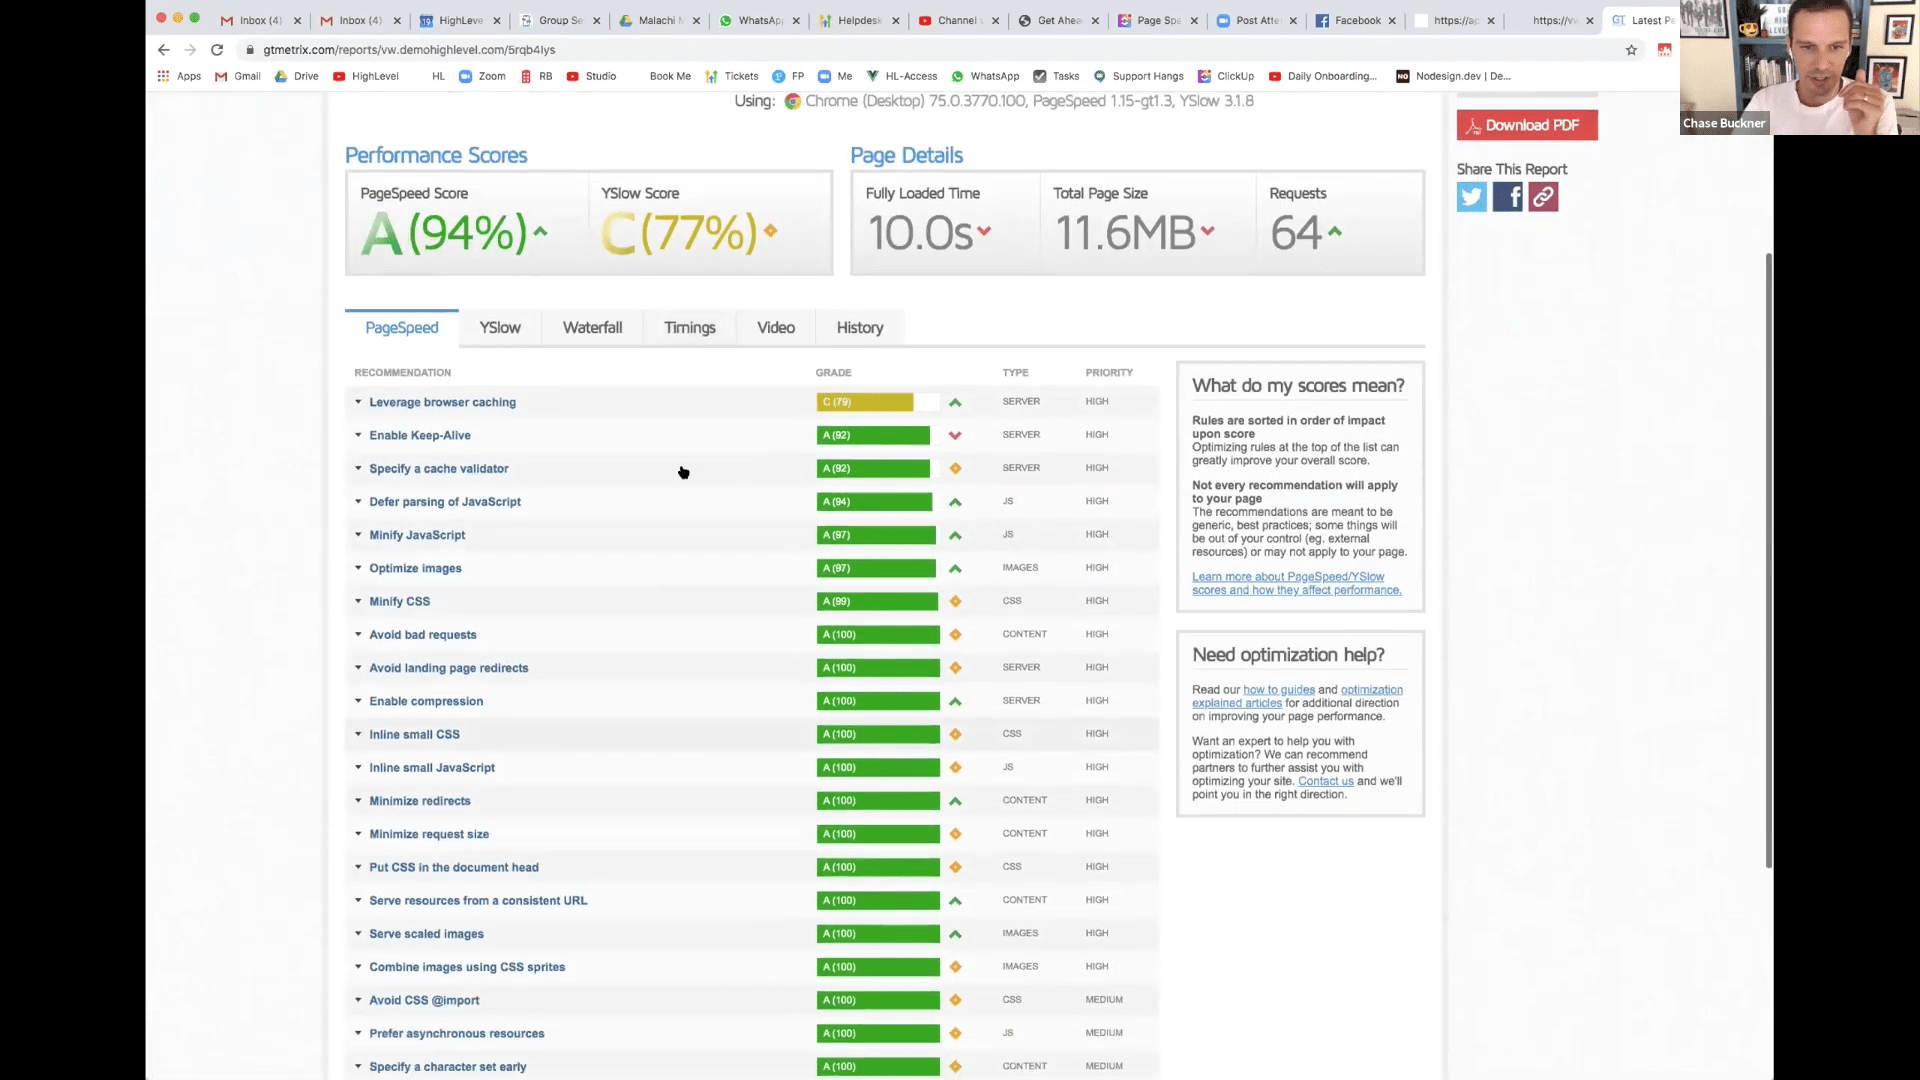
Our time for a fully loaded page is 10 seconds, which is too high. Our goal is to get this down as low as possible with our 3 hacks…
So, let’s start with…
Trick #1: Reduce the Size of Your Images
If you want your pages to be attractive, then it has to have some compelling images…
But here’s the thing – the images on your page could be weighing it down. And if your visitors are closing your page because it’s taking forever to load, then…
They’re never going to see your great images in the first place.
With this trick, we’re going to make the file size of our images much smaller…
Meaning that they’ll load rapidly, closing the gap between when a visitor clicks your link and when they see your page.
Let’s look at our page again:

As you can see, there are two images at the top, both of which could use some optimization (and there’s even more further down)…
Now, you can use whatever program you’re comfortable with for editing images, but one of our favorite online resources is tinypng.com, which lets you compress your image files…
You could also use Photoshop, paint.net, or any other of a million image editing programs…
But the point is this – you want all the images on your page to come in at about no more than 200kb for an optimal blend of resolution and load time.
So once you’ve edited your images and uploaded them back into your HighLevel page, you should already be seeing some performance gains…
However, let’s take our page speed even further with…
Trick #2: Google Maps Without the Heavy Load
Google is pretty much the gold standard when it comes to maps…
But there’s a pretty big problem – Google Maps is a massive memory hog, which means when it’s embedded on your site, it could be a major contributor to a slow-loading page…
For this hack, we’re going to keep the great look of Google Maps AND trim down its weight at the same time…
How do we do that?
At the bottom of our HighLevel page, we have 2 Google Maps embeds that are doing some serious page-loading damage:
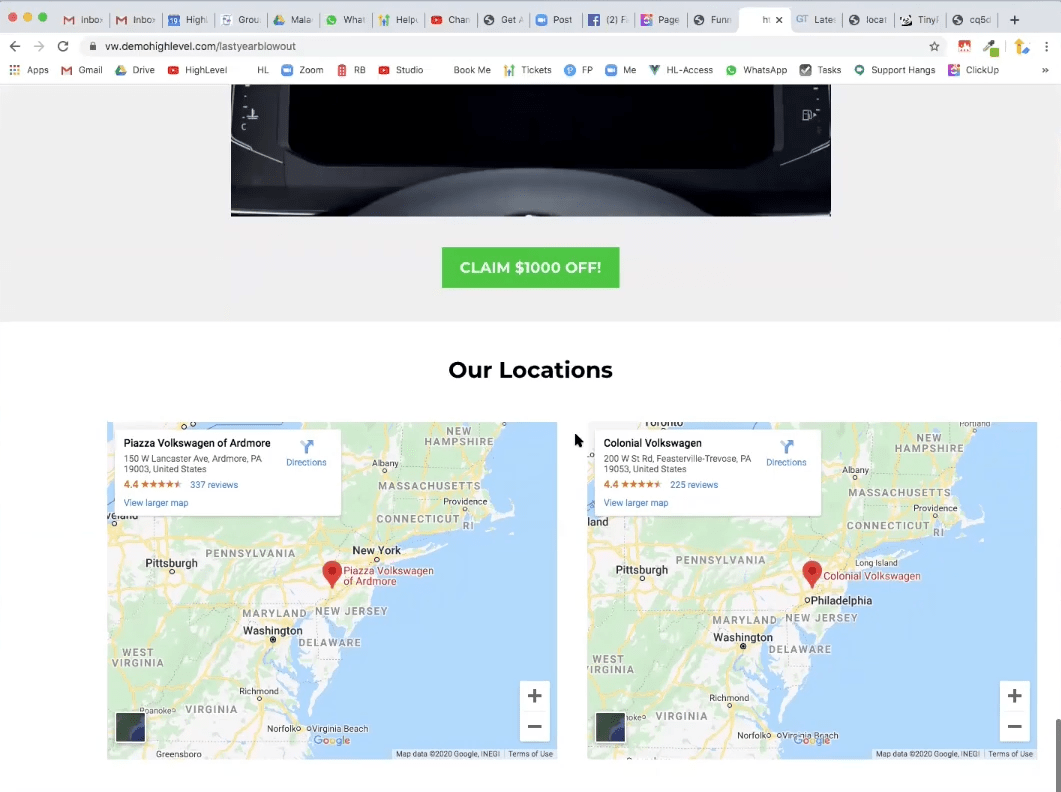
What we’re going to do is essentially turn these embeds into images…
I’ll take a screenshot and then crop it down using an image editing program:
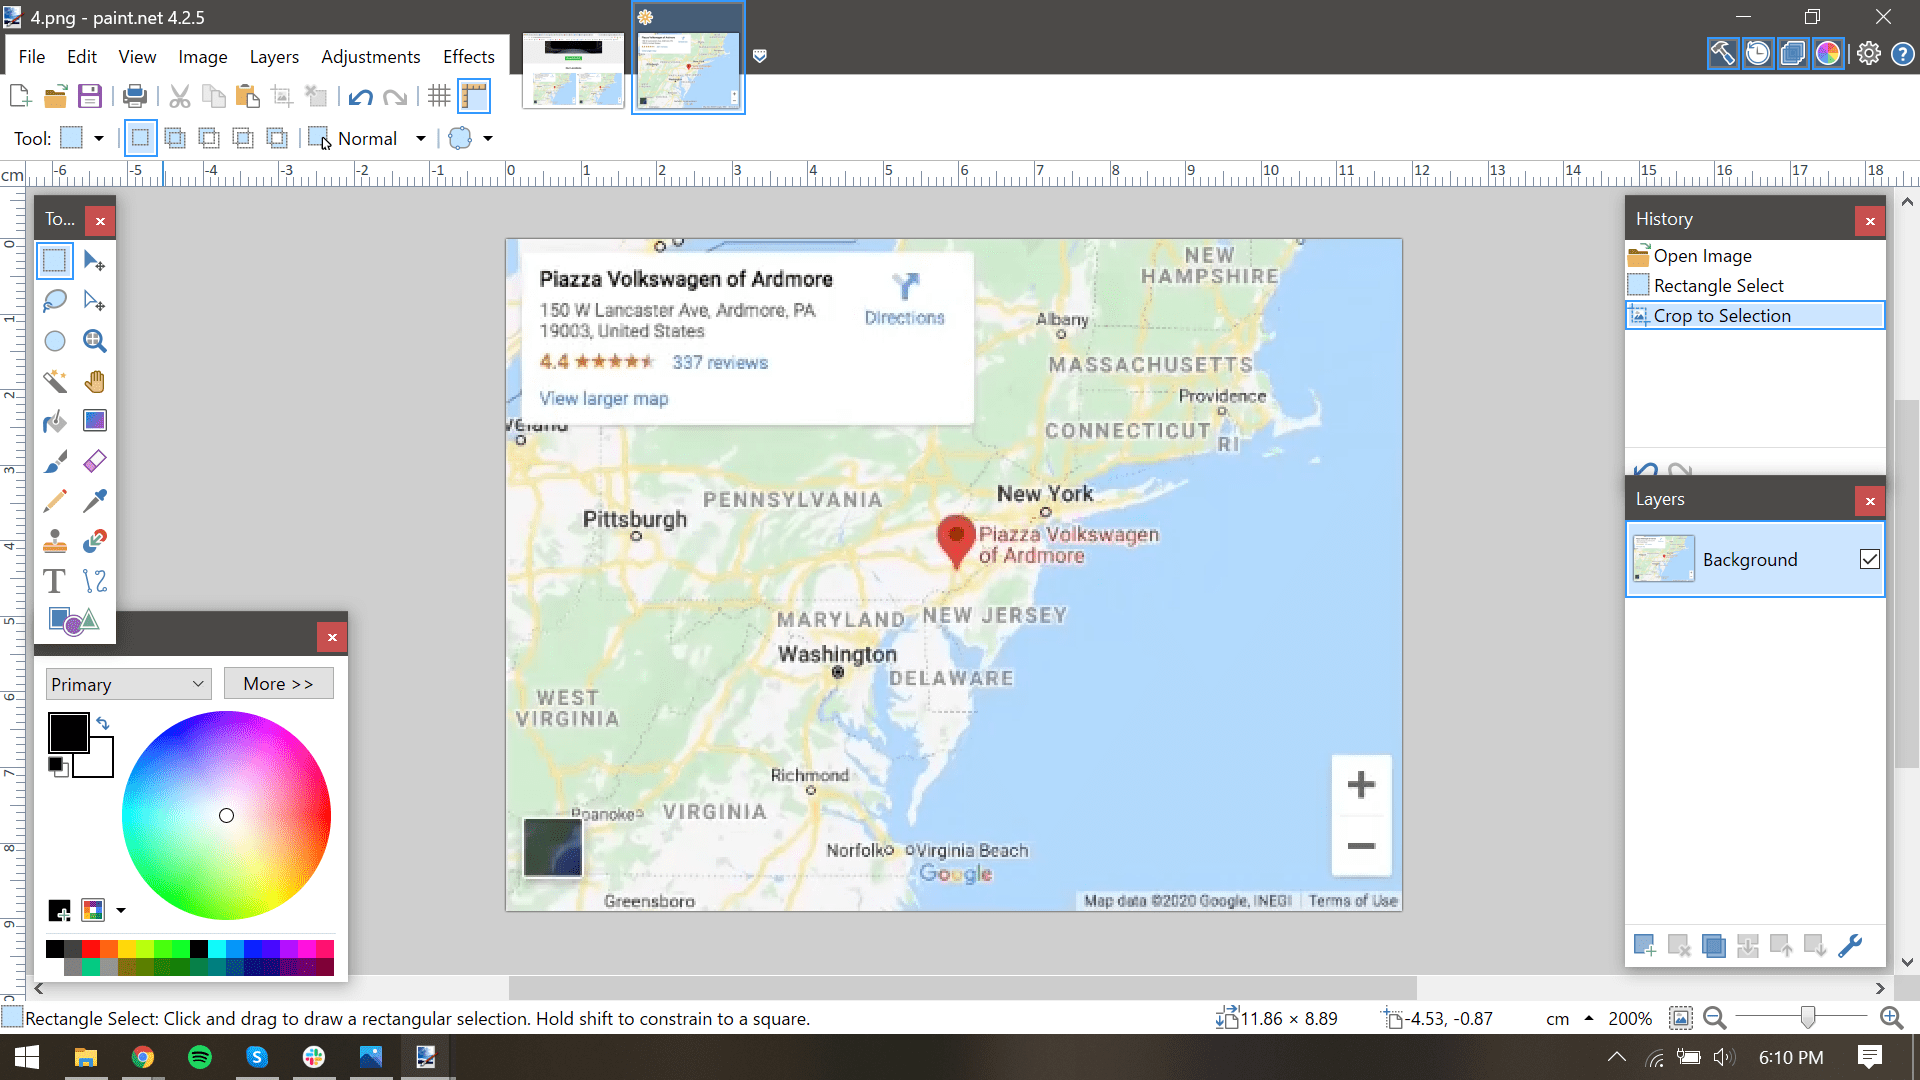
Now, I’m going to upload this new image into the HighLevel page to replace the Google Maps embed.
Sure, the functionality of the map on the page is lost, but the truth is that the improvement it makes to our page load speed is certainly worth the trade-off…
But, we’re going to do something tricky to avoid losing even that small trade-off…
In HighLevel, we’re going to add a link to our new image that opens a functional Google Maps page in a new tab.
To get the link, we search for the business in Google Maps, and then copy the link that appears when we click Share:
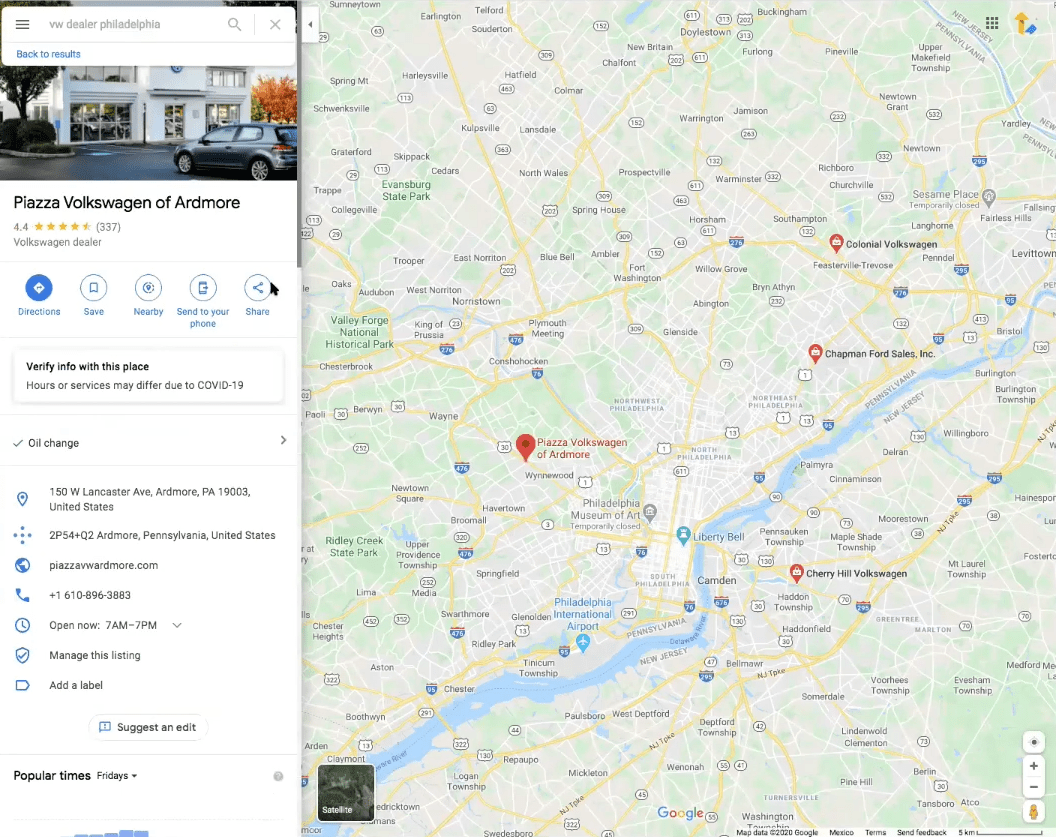
And then just paste it into the image link field in HighLevel.
Pretty clever, right?
So now we have the functionality of Google Maps without negatively affecting page load time, which is exactly what we want…
And if we ran GTmetrix again, we certainly would notice the difference…
But we’re going to wait until we’ve done our third hack to see just how much an improvement we’ve made.
>> For more clever, value-added HighLevel hacks and scripts, sign up for a free, 14-day Pro membership with GHL Experts! >>
And the time for that third hack is right now…
Hack #3: Change Your Page’s DNS Settings
Granted, this trick is a little bit more technical than the other two, but we promise that it’s easier than it sounds…
What we’re going to do is change our page’s settings to use a new, speed-friendly feature that’s part of HighLevel called Flash Funnels. It hasn’t been completely rolled out yet, but it’s perfectly stable and worth using.
You’re probably familiar with this window that appears when you add a new domain to HighLevel (Settings → Domains):
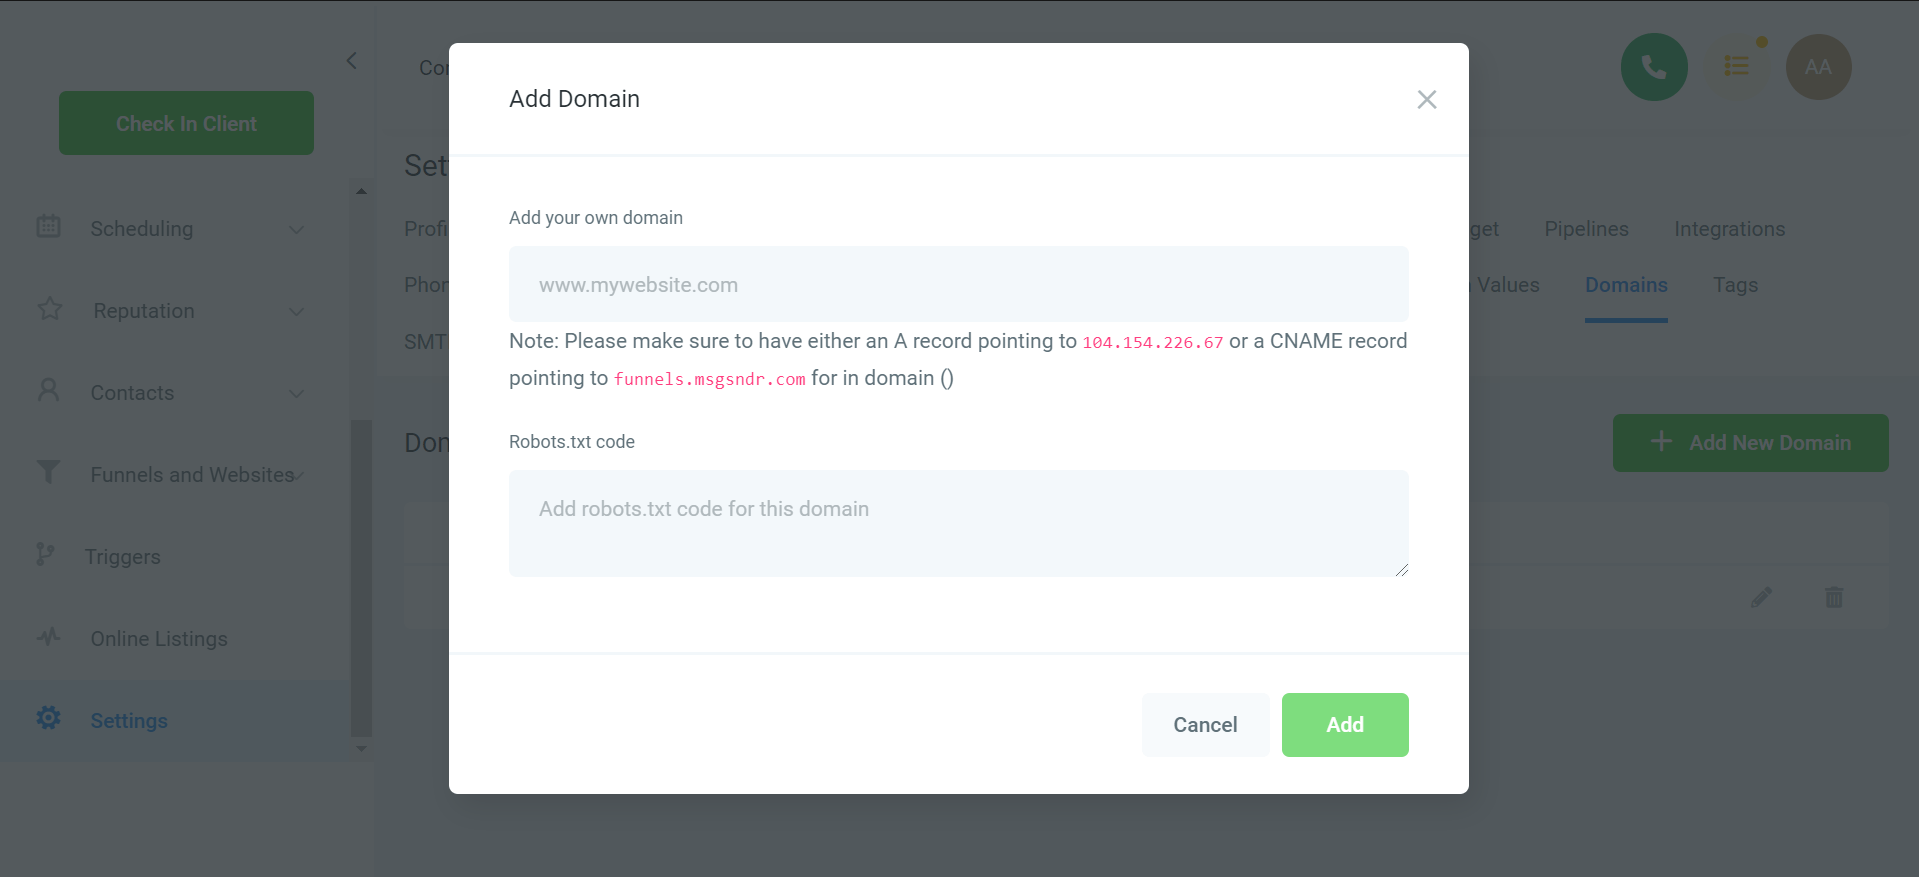
It tells you to add a CNAME record in your DNS that points to funnels.msgsndr.com, which is basically just telling the DNS how to find your HighLevel page…
And if you’ve added a domain, then you almost certainly created that CNAME record.
To change it to the Flash Funnels feature, all you need to do is sign into your DNS manager and go to your domain’s DNS settings. We’re using Cloudflare, but any manager will have a similar setup:
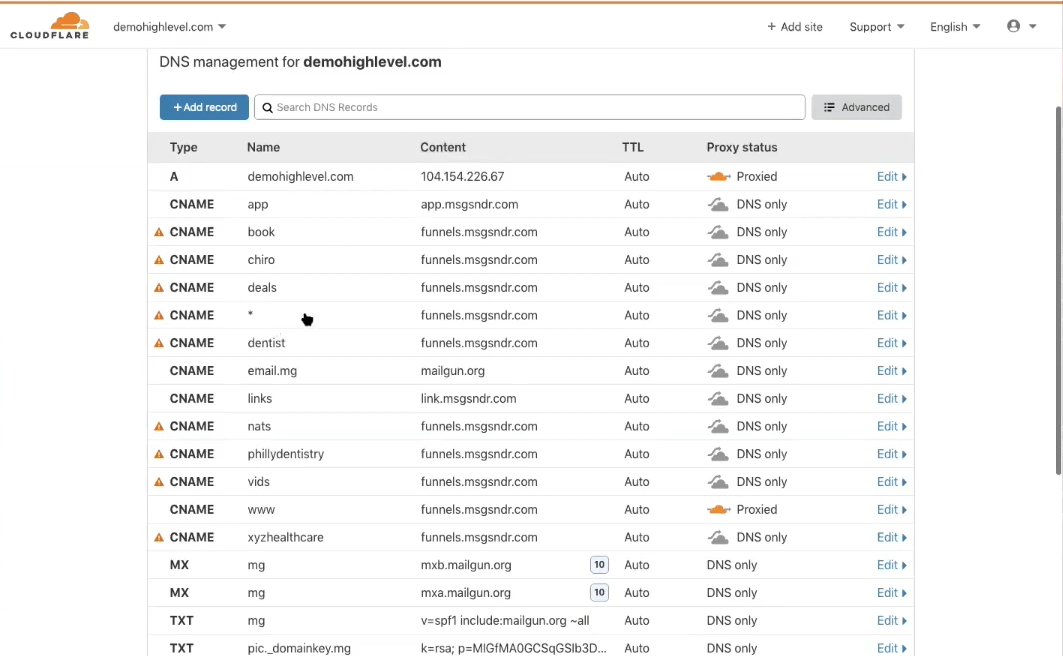
Once there, find the domain and edit the CNAME record to change funnels.msgsndr.com to flash.funnels.msgsndr.com.
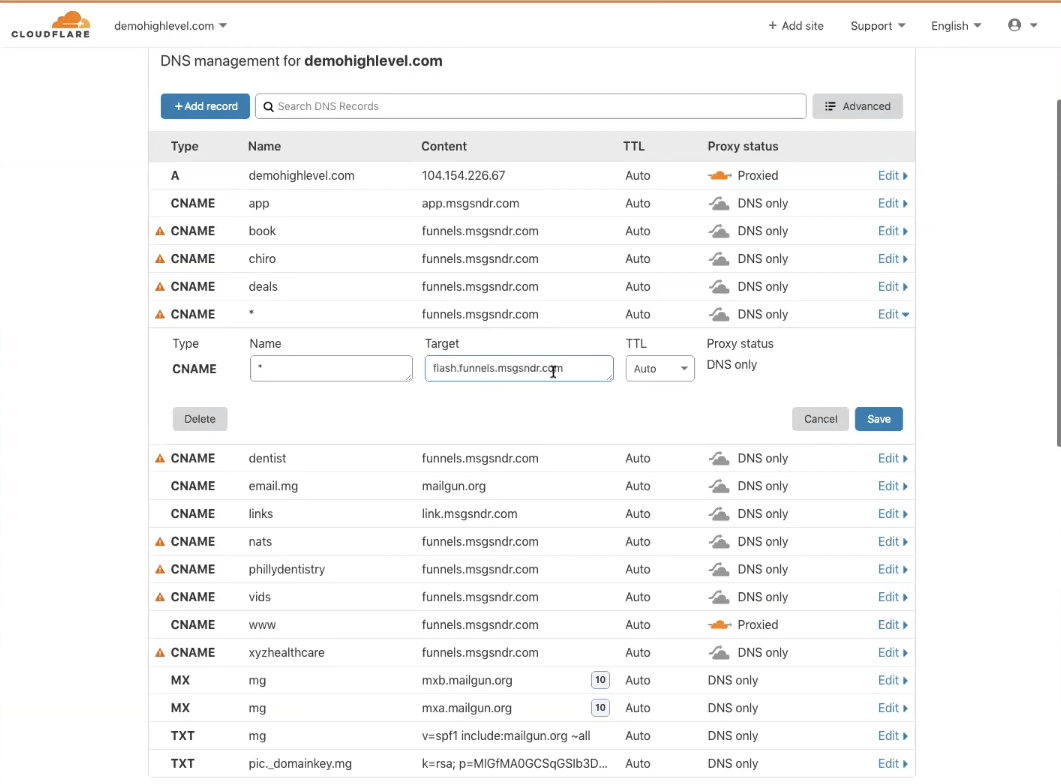
And that’s really all there is to it!
So, we’ve made 3 quick hacks and now it’s time for…
The Moment of Truth
Now is the moment we’ve been waiting for… let’s head back over to gtmetrix.com and run our report again…
Drumroll, please…
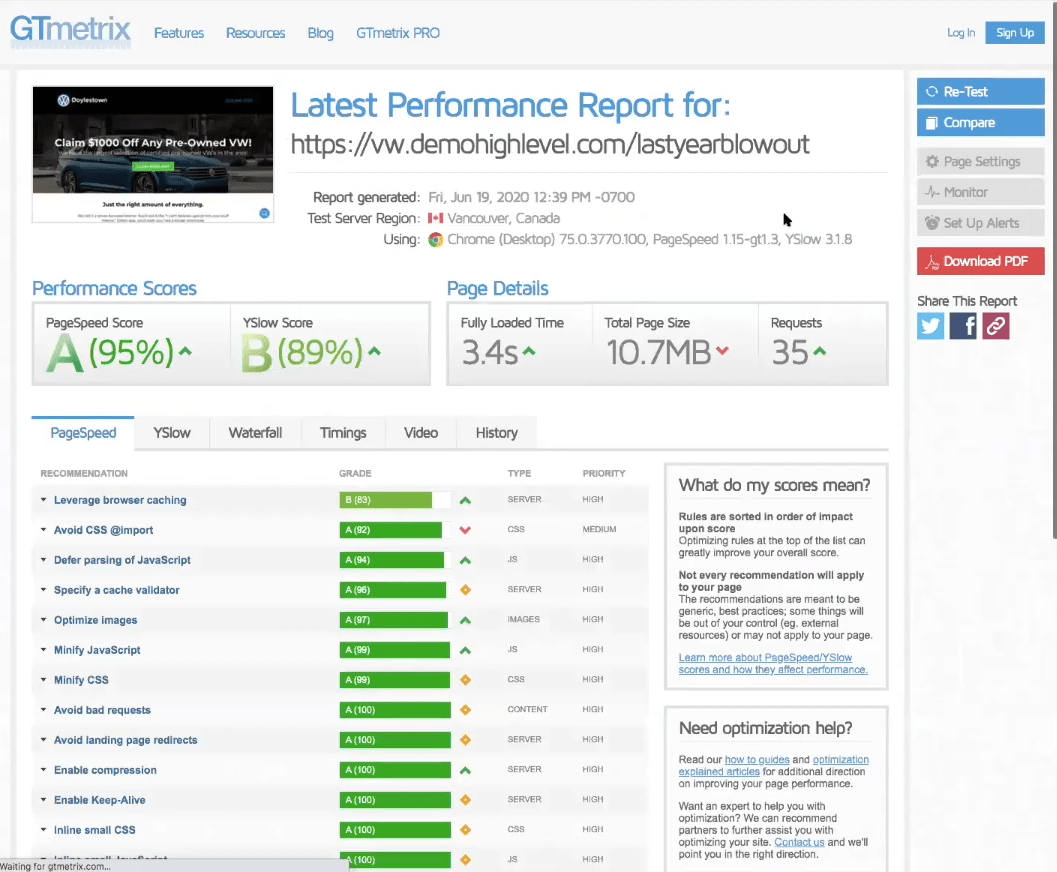
Awesome!!!
Instead of the 10 seconds load time we had at the start of this article, we now have a snappy load time of 3.4 seconds…
And truth be told, we could trim that down even further to have a lightning-fast HighLevel page, but it’s definitely good enough to show how these 3 easy hacks can give you tremendous page speed gains…
So if you’d like to improve how quickly your HighLevel pages load, give these hacks a try…
And if you’re searching for other ways to enhance your HighLevel experience, then…
>> Sign up for a free, 14-day trial of GHL Experts PRO and take your marketing to the next level! >>
Note: The screenshots and idea for this article come from Chase Buckner’s excellent YouTube video describing this process. You can see the video here.
3 Ways to Create and Automate a HighLevel Appointment Reminder Campaign
 As you’ve likely already noticed, HighLevel has a ton of features right from the jump…
But the true power of the platform shows up when you start integrating these features together to automate your everyday tasks…
And that’s exactly what I want to show you today – a simple way to merge Appointments, Campaigns, and Triggers into an automated appointment confirmation and reminder system…
Before we dive into the technical details of this hack, let’s find out if it’s something you should implement…
As you’ve likely already noticed, HighLevel has a ton of features right from the jump…
But the true power of the platform shows up when you start integrating these features together to automate your everyday tasks…
And that’s exactly what I want to show you today – a simple way to merge Appointments, Campaigns, and Triggers into an automated appointment confirmation and reminder system…
Before we dive into the technical details of this hack, let’s find out if it’s something you should implement…
Would you or your clients benefit from an automated appointment reminder campaign?
Let me ask you a few questions. Have you ever…- Had a scheduled appointment and the client didn’t show up?
- Manually sent an email to confirm an appointment?
- Called a client to remind them of their appointment with you?
- Forgot to confirm an appointment or send a reminder?
 So, what does a HighLevel appointment reminder campaign do? It…
- Standardizes your confirmation and reminder process.
- Sends confirmation emails immediately when the appointment is scheduled.
- Automates appointment reminders.
- Create your appointment reminder campaign
- Add appointments to your campaign:
- Automated with HighLevel’s appointments feature
- Manually through Conversations
- Automated using a 3rd party app
Step 1: Create Your Appointment Reminder Campaign
I’m going to assume you know how to build a campaign, but a good structure might look like this: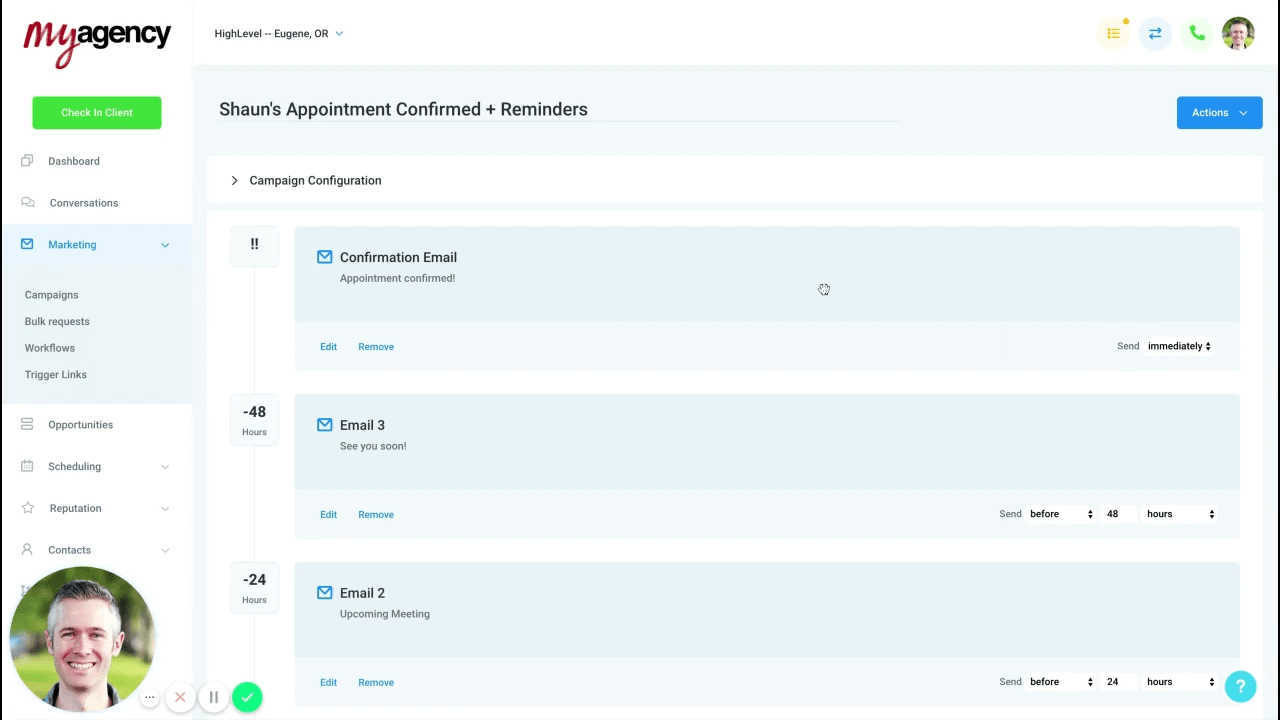 Here, you’ve got the following events:
- Confirmation email – sent immediately
- Email 3 – 48 hours before appointment
- Email 2 – 24 hours before appointment
- Email 1 – 2 hours before appointment (not visible)
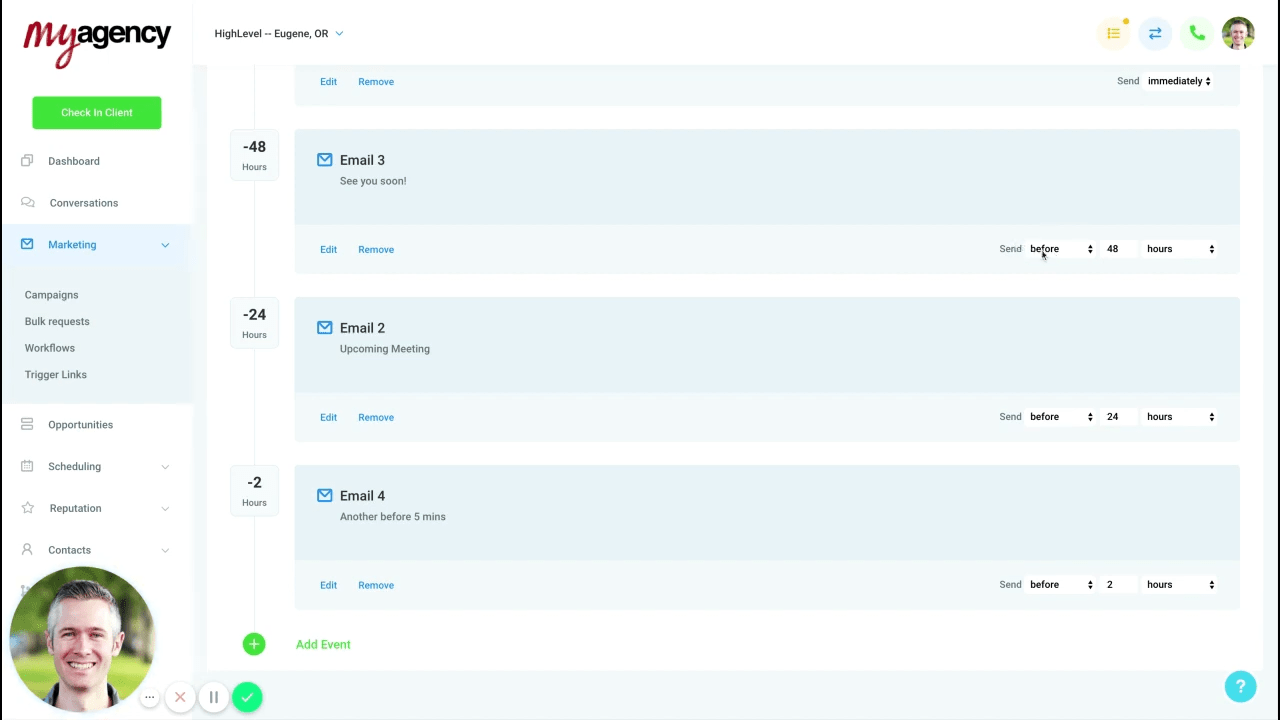 Keep in mind that your campaign events don’t have to be emails. And in fact, SMS events may be more effective, especially for the 2 hour reminder.
Let’s open up the confirmation email to take a look…
Keep in mind that your campaign events don’t have to be emails. And in fact, SMS events may be more effective, especially for the 2 hour reminder.
Let’s open up the confirmation email to take a look…
 Of course, you can write any text for your emails. This example of the confirmation email uses custom values to pull in the contact’s name and appointment time,
Subject:
Appointment confirmed!
Body:
Hey {{contact.name}},
Your appointment at {{appointment.start_time}} is confirmed, can’t wait to chat!
For the subsequent emails, here’s some sample text you could use:
Of course, you can write any text for your emails. This example of the confirmation email uses custom values to pull in the contact’s name and appointment time,
Subject:
Appointment confirmed!
Body:
Hey {{contact.name}},
Your appointment at {{appointment.start_time}} is confirmed, can’t wait to chat!
For the subsequent emails, here’s some sample text you could use:
 Subject:
See you soon!
Body:
Hey, just a quick reminder, we have a meeting scheduled on {{appointment.start_time}}. See you then!
Now, there’s one more thing you’ll need to do to set up your campaign…
Go back to the top of the page and click Campaign Configuration.
Then scroll down and disable the Stop on response toggle. What this does is ensure that your client will continue to get the reminders even if they respond to your email.
Subject:
See you soon!
Body:
Hey, just a quick reminder, we have a meeting scheduled on {{appointment.start_time}}. See you then!
Now, there’s one more thing you’ll need to do to set up your campaign…
Go back to the top of the page and click Campaign Configuration.
Then scroll down and disable the Stop on response toggle. What this does is ensure that your client will continue to get the reminders even if they respond to your email.
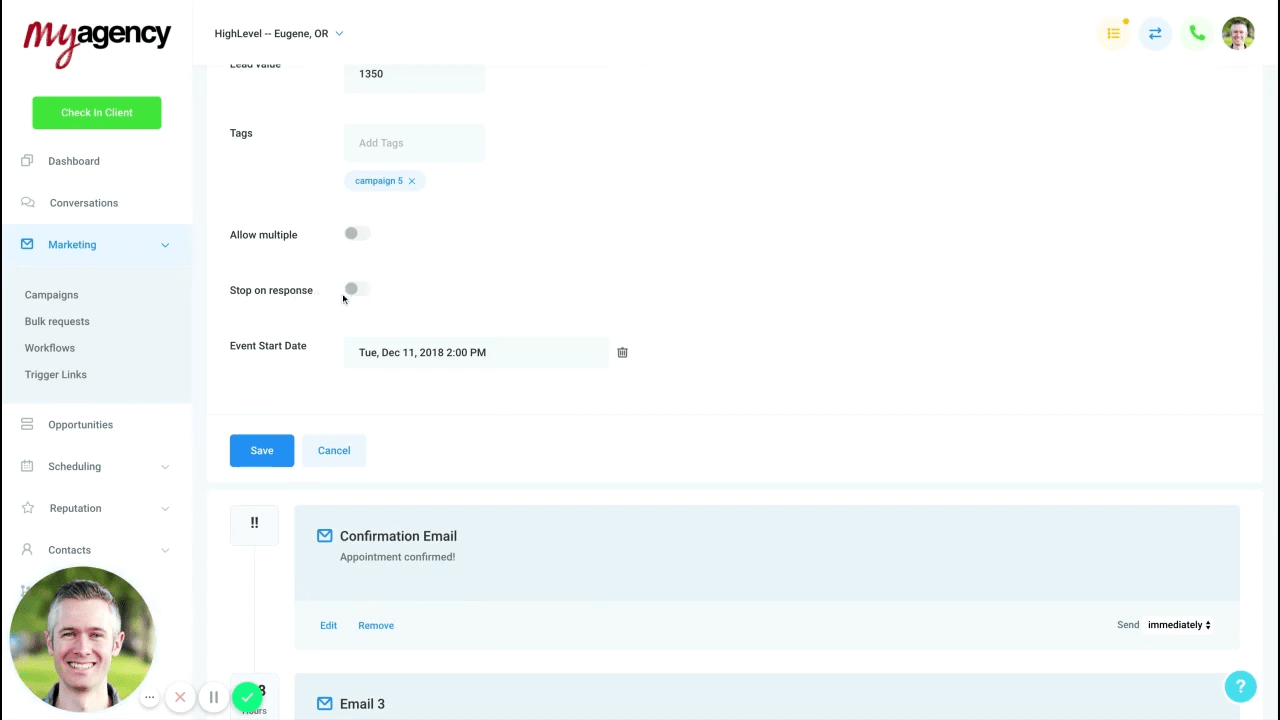 Lastly, click Publish at the top right to make your appointment reminder campaign active.
Awesome! Your campaign is created. Now it’s time for…
>> Discover a full library of HighLevel hacks and scripts with your free, 14-day Pro GHL Experts membership! >>
Lastly, click Publish at the top right to make your appointment reminder campaign active.
Awesome! Your campaign is created. Now it’s time for…
>> Discover a full library of HighLevel hacks and scripts with your free, 14-day Pro GHL Experts membership! >>
Step 2: Add Appointments to Your Campaign
Ok, so depending on how you schedule appointments, you’ll use one of the following three methods for adding them to your campaign:- Automated with HighLevel’s appointments feature and widget
- Manually through Conversations
- Automated using a 3rd party app
a. Automated with HighLevel’s appointments feature
If you’re already using HighLevel or the website widget to book appointments, then adding them to your campaign is super simple… All you need is to create a new Trigger: In the left column, you’ll define what causes your trigger to fire and add a couple filters…
Select Appointment from the event dropdown.
And then add 2 filters:
In the left column, you’ll define what causes your trigger to fire and add a couple filters…
Select Appointment from the event dropdown.
And then add 2 filters:
- In Calendar -> select your Calendar
- Appointment Status is -> select Confirmed
b. Manually through Conversations
If your appointments are mainly scheduled over the phone or through text messages, then it’s still incredibly easy to get them added to your campaign, but you’ll need to manually perform 1 step…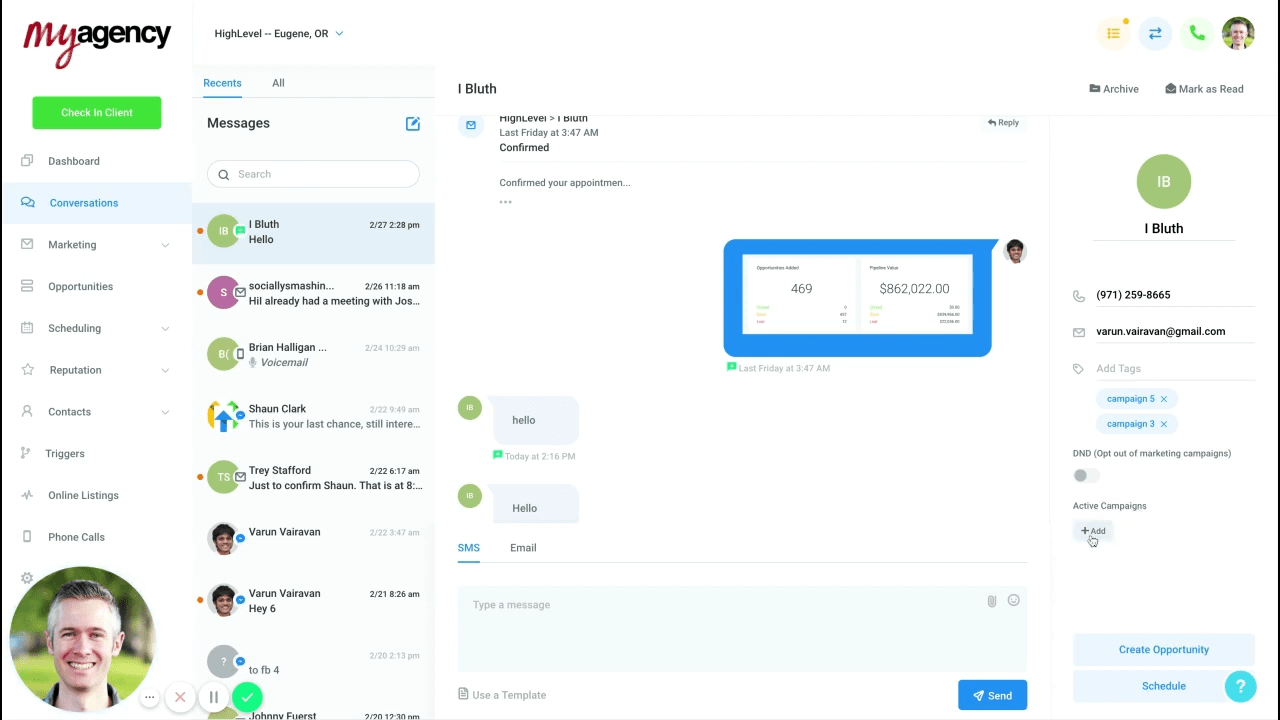 To add a new appointment, open your Conversations from the left menu, select the contact, and then click the Add button under Active Campaigns on the right sidebar.
This opens a pop-up window…
To add a new appointment, open your Conversations from the left menu, select the contact, and then click the Add button under Active Campaigns on the right sidebar.
This opens a pop-up window…
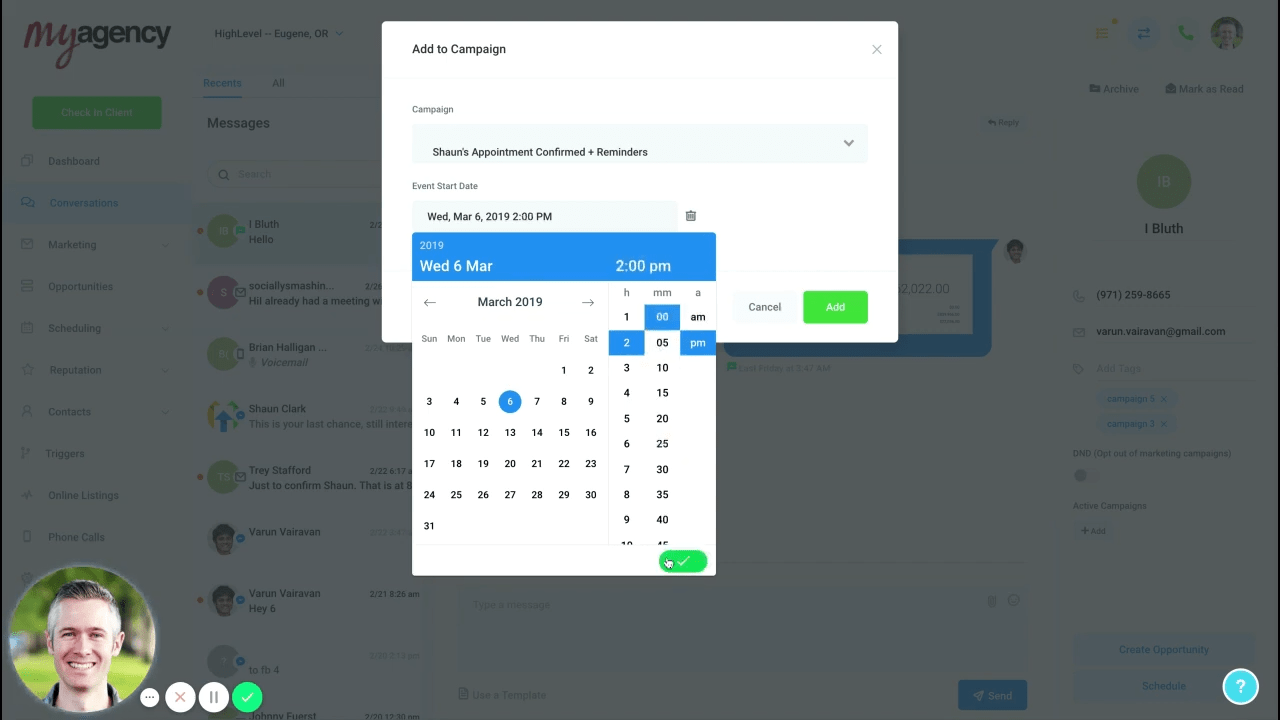 In the campaign dropdown, select your appointment reminder campaign.
And then set the date and time of the appointment in the Event Start Date field.
Voila, again! Your client is added to the campaign, so they’ll receive the confirmation and reminders.
Lastly, let’s explore how your campaign’s appointments can be…
In the campaign dropdown, select your appointment reminder campaign.
And then set the date and time of the appointment in the Event Start Date field.
Voila, again! Your client is added to the campaign, so they’ll receive the confirmation and reminders.
Lastly, let’s explore how your campaign’s appointments can be…
c. Automated using a 3rd party app
If you’re using a 3rd party app for scheduling appointments, then the best solution for integration is Zapier. Here’s how you’ll create a new Zap: For the trigger section, you’ll need to select the app and event for when a new appointment is booked (obviously depends on the app you’re using).
For the action, simply select HighLevel as the app for your trigger…
And then choose Add Lead to Campaign.
Next, you’ll need to fill in the fields that appear, making sure to select your new campaign and pulling the Event Time from your 3rd party app (if possible).
And voila once more!
No matter which method you choose, creating and automating an appointment confirmation and reminder system is a perfect example of how HighLevel can be used to both save your time and increase your efficiency.
For more ways to supercharge your HighLevel experience…
>> Sign up for a free, 14-day trial of GHL Experts PRO and turn your workflow into a streamlined machine! >>
Note: The screenshots and idea for this article come from Shaun Clark’s excellent YouTube video describing this process. You can see the video here.
For the trigger section, you’ll need to select the app and event for when a new appointment is booked (obviously depends on the app you’re using).
For the action, simply select HighLevel as the app for your trigger…
And then choose Add Lead to Campaign.
Next, you’ll need to fill in the fields that appear, making sure to select your new campaign and pulling the Event Time from your 3rd party app (if possible).
And voila once more!
No matter which method you choose, creating and automating an appointment confirmation and reminder system is a perfect example of how HighLevel can be used to both save your time and increase your efficiency.
For more ways to supercharge your HighLevel experience…
>> Sign up for a free, 14-day trial of GHL Experts PRO and turn your workflow into a streamlined machine! >>
Note: The screenshots and idea for this article come from Shaun Clark’s excellent YouTube video describing this process. You can see the video here.